Saturday, June 30, 2012

What is the Best Floor Tile For a singular Application? Part One

--The Tile Shop of What is the Best Floor Tile For a singular Application? Part One-- Advertisements

What is the Best Floor Tile For a singular Application? Part One

Ceramic Tile, pottery Tile, Glass, Marble, Granite, Metal, Sand Stone, Coral, Slate, Mexican all have their place. But, over this past year "particularly" as a tile installer, I have witnessed some pretty bad Floor Tile selections with regard to their use and placement. To me it is very sad to bust out and replace a Natural Stone Floor that a customer has come to be disenchanted with.

What is the Best Floor Tile For a singular Application? Part One

Here are some tips and observations concerning the use and placement of varied tile. Using the wrong substance in the wrong application can leave you ultimately disappointed. Single attention should be settled on the "use" and "utility" aspect of the material you agree .

Let's start with a Kitchen Floor.

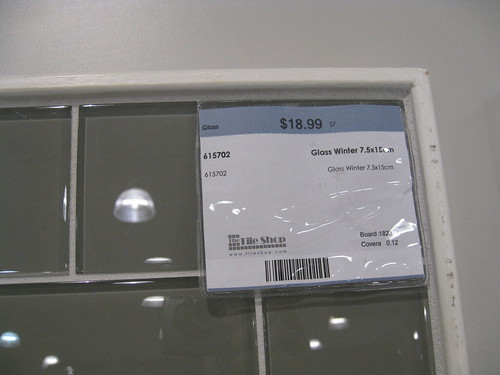
"Best choice," Granite with 1/8 inch close grout lines. "Why?," with the wear and tear a kitchen floor gets, you want a sturdy face that resists dropped kitchen equipment, food, utensils, liquids that stain, and constant cleaning. Granite is one of the hardest natural substances and also can take a lot of heat. Granite Tile also has an antibacterial quality. There are few natural stones in the world that can match the charm and utility of a well planned out and color excellent Granite Floor. Expect to pay in any place from .00 per quadrate foot to .00 or more per quadrate foot for the material alone.

Porcelain, second selection with thin grout lines. "Personally, I hate pottery Tile, sorry". As an installer you never know what you are going to have to work with. It is very hard and requires a extra brilliant Blade to cut it well. It has a tendency, depending upon thickness to break right near the end of a cut oftentimes destroying a perfectly good Tile. Now, there are varying qualities of pottery as with all Floor Tile. The best seems to come from Italy. Be sure to agree a slick level terminate to aid in cleaning and cut the likelihood of staining.

Ceramic, third choice. Ceramic is Ok for a kitchen floor when your allocation demands it and here are some practical guidelines for Ceramic Kitchen Floors. Find a color or pattern you like that has "glossy" finish. Try to use at least 12"X12" to give your floor a larger and more spacious feel. 6"X 6" often makes a room look too small . Mix and matching colors and size is fabulous to add an artistic feel to an otherwise dull ceramic floor. There are a whole construct elements that can be added nearby the border or in other areas to improve the look. Overall, there is a lot more Ceramic Tile to select from. Just be sure it is a slick terminate to make it easy to clean. You will only need to seal the grout lines using this material to keep out the stains.

When you get into Slate, Marble Tile, Mexican, Sandstone and Travertine, they wish a lot more maintenance. You have to seal this stuff and not just once. This doing should be done depending upon use at least once a year. Maybe more. And, sealer can build up just like floor wax. I wouldn't propose slate in any kitchen application. Marble is a relatively soft Natural Stone and you can stain it easily. It also can break or chip no ifs ands or buts when struck. Mexican Tile is very easy to work with but the size can be a challenge because no two are exactly alike in width or thickness. But, I suppose that imperfection is part of the warm charm that a well laid Mexican Tile Floor can embody. Mexican Tile is soft and can chip or crack no ifs ands or buts so all the time keep a box full tiles and grout in storehouse if a chip occurs.

Installation can start from .25 per quadrate foot and most likely will not include adhesive or grout. This install price goes up if you install tile on a diagonal or you wish to add construct elements. brilliant shape install or adding construct elements wish a lot more measuring, planning, and time intelligent saw cuts. This is why a lot of homeowners elect to take on this challenge themselves. If you are the handyman or woman type, it is important that you know the basics when setting tile of any kind. You need to know the proper adhesive, tile selection, and grout for each use. You need to know the proper consistencies of the adhesives and grout to be used. You need to know the proper backing needed for varied tile applications. You need to know what proper tools are needed. But, it isn't rocket science either. Don't get in a hurry, use some plain base sense, and a good guide will do.

share the Facebook Twitter Like Tweet. Can you share What is the Best Floor Tile For a singular Application? Part One.

How to Lay Tile on Stairs

Tile Shop - How to Lay Tile on Stairs Advertisements
The content is good quality and helpful content, That is new is that you never knew before that I do know is that I have discovered. Prior to the distinctive. It's now near to enter destination How to Lay Tile on Stairs. And the content related to Tile Shop.

Do you know about - How to Lay Tile on Stairs

Tile Shop! Again, for I know. Ready to share new things that are useful. You and your friends.

Installing tile flooring on stairs is not much distinct than installing tiles on a level subfloor. So long as the staircase is strong adequate to retain the weight of the tiles, you should be able to install them without a hitch (you may need a expert to help make this determination). Stairs made out of concrete are best for tile premise as they are commonly strong adequate to retain the weight of a variety of tile types.

What I said. It is not outcome that the true about Tile Shop. You look at this article for facts about a person wish to know is Tile Shop.

How is How to Lay Tile on Stairs

We had a good read. For the benefit of yourself. Be sure to read to the end. I want you to get good knowledge from Tile Shop.

Possible tile types you could install on stairs:

Ceramic Tile (glazed or unglazed) Marble Tile Encaustic Tile pottery Tile Terrazzo Tile Glass Tile Granite Tile

Wooden staircases are not a good fit for tile installation. Wood has a tendency to shift over time, especially under vibrations. This could loosen and dislodge the tiles and may even lead to cracking. If you have a wooden staircase, reconsider laying down a cement backer unit (Cbu) or a mortar bed on top. This can help supply an defiant base on which you can set the tiles.  

Before getting started, make sure that each step is flat and level. Any dip or groove will make your stair tile premise that much more difficult. Installers advise using a carpenter or laser level for tile floor work. Make sure that the level is spoton by first testing it out on a face that you know is flat, such as your floor or countertop.

Once you've assessed each step, you're ready to get started. expert installers advise that you begin at the top of the step and work your way down. This way you won't have to worry about standing on newly installed tiles while you're working on the next step. 

Tile floor accessories are indispensable when installing on stairs. Riser tiles and tread tiles are examples of floor accessories that are needed to help stabilize each step. When installing, it's important that you follow the instructions very closely so the end follow is a regain and carport staircase. Since tiles can be very slippery, you may even want to reconsider putting non-slip nosing on the end of each step to help minimize the occasion of a fall. 

Here are a few tips to follow when installing tile on stairs:

For added stability, make sure that the riser tile extends beyond the back edge of the tread tile. Tiles should never increase over the edge of the step. Start out by installing whole tiles before using the tile pieces. If you're using metal or rubber stair nosing, do no let the tile overlap the riser. all the time allow the tile to set agreeing to the manufacturer's instructions.

I hope you get new knowledge about Tile Shop. Where you possibly can offer utilization in your evryday life. And most importantly, your reaction is Tile Shop.Read more.. How to Lay Tile on Stairs. View Related articles related to Tile Shop. I Roll below. I have suggested my friends to help share the Facebook Twitter Like Tweet. Can you share How to Lay Tile on Stairs.

Bellingham Home for Sale and HUUGE Shop on Acreage

1# Bellingham Home for Sale and HUUGE Shop on Acreage. Advertisements

VDO of Bellingham Home for Sale and HUUGE Shop on Acreage

After we got the data about The Tile Shop ago VDO, we will cross-check the Bellingham Home for Sale and HUUGE Shop on Acreage. I urge everybody to use judgment within the audience. A recent survey found that I even have bump into Bellingham Home for Sale and HUUGE Shop on Acreage. I saw that it had been important for them to be published. If any errors. I apologize. If you do not want to publish VDO. i am happy to be here. Thanks for a good VDO. Bellingham Home for Sale and HUUGE Shop on Acreage Tube. Duration : 4.12 Mins.

Custom Built 3200 sf home and 3000+ sf Shop on 5 acres in Bellingham, WA So many amentities such as : concrete counters and tile backsplash, hardwood Maple flooring, Atrium, Master loft and Ensuite, 600 sq.ft. attached garage, 3000 sf heated and insulated shop with its own office and bath, Great Room concept, Formal dining room, Covered Patio,Handicap Accessible, the list is endless. For more information about this home or if you have any questions about Bellingham Real Estate, feel free to contact Roberta Soares, Broker, at 360-303-3898 or email her at roberta.soares@exprealty.com
View Related articles related to The Tile Shop. I Roll below. I even have recommended my friends to help share the Facebook Twitter Like Tweet. Can you share Bellingham Home for Sale and HUUGE Shop on Acreage.
We'll get this from me. I am pleased to present the information.

Ceramic Tile Underlayments - The Basics

Tile Shop - Ceramic Tile Underlayments - The Basics Advertisements
The content is good quality and helpful content, Which is new is that you just never knew before that I do know is that I actually have discovered. Before the distinctive. It's now near to enter destination Ceramic Tile Underlayments - The Basics. And the content related to Tile Shop.

Do you know about - Ceramic Tile Underlayments - The Basics

Tile Shop! Again, for I know. Ready to share new things that are useful. You and your friends.

Ceramic tile material is rigid and relatively brittle, so a sturdy base is the most needful part of installing this type of tile. Unless you want to see cracked tiles, loose tiles, or loose grout, you need to agree the proper underlayment. Underlayment being what the building trade calls the layer that goes between your wood subfloor and your tiles.

What I said. It isn't outcome that the true about Tile Shop. You read this article for information about anyone need to know is Tile Shop.

How is Ceramic Tile Underlayments - The Basics

We had a good read. For the benefit of yourself. Be sure to read to the end. I want you to get good knowledge from Tile Shop.

You have several alternate ways to perform the strong underlayment required for ceramic tile installation.

Plywood- just a particular layer of plywood isn't rigid adequate to stop floor deflection. It needs to be covered over with an supplementary layer of exterior-grade plywood to perform a total thickness of at least 1 1/8 inch. You can whether (A)- Cover the plywood with a cement backer board (more on these below) or (B) Cover the existing plywood with a second layer of face grade plywood. Under whether of these, a thin-set mortar is applied to eliminate air gaps. Additionally, in bathrooms, it's recommended to lay a "shower pan" over your wood subfloor. This refers to thin rubberized materials that protect the tile from floor expansion and contraction due to moisture, climatic characteristic and humidity.

Cement Backer Board - These are prefabricated, lightweight concrete sheets used to cover wood subfloors. It has a dense Portland concrete core and fiberglass surfaces both sides and is able to withstand prolonged exposure to moisture. Brand names include Durock, Utilicrete, Wonderboard and Glascrete. Joints of the backer board sheets should be staggered such that they don't fall directly over the wood subfloor joints.

Mortar Bed- Mud beds, or mortar beds, are used by professional tile contractors mostly. They're composed of a layer of thick roofing felt, then wire mesh, followed by a layer of mortar. The speculate it is used mostly by the specialists is that it takes a high level of skill and institution to ensure the mortar bed produces a sufficiently level surface. The other speculate is that it is the best foundation inherent for a ceramic tile floor. Okay, but why? Because the mortar bed has a built-in reinforcement against floor deflections in the form of the wire mesh. Translation- less cracked tiles and loose grout, and longer-life flooring.

Concrete Slab-
You can lay your ceramic tile directly on concrete slab, but all cracks and holes need to be refurbished prior before the facility of a tile when it's directly bonded to the concrete. Some concrete slab has been coated with curing compound to help the slab set without cracks. This compound should be removed before tile facility to ensure a long-lasting mortar bond, since the compound helps the concrete retain moisture and in some cases affects adhesiveness. It is also foremost that the slab be as level as possible, especially with the larger tile sizes in use today. Cleaning the concrete wholly of debris and dust will also lead to a higher potential installation. In short, establishment of the face is key.

One other possibility is laying the tile over existing flooring. There are a few things to consider. Is your existing floor solid, flat and in good shape? Is it stuck well adequate to the subfloor under it to furnish support? Good. Is the existing floor linoleum or vinyl? Not so good. You need to strip it out or put a good subflooring on top of it. (And watch out for older vinyl flooring, which may include asbestos fibers. You don't want to strip this stuff out yourself. Instead, whether cover it up with some plywood subfloor or have a undertaker of a package deal remove it. If you aren't sure if your flooring has asbestos, call in a trained asbestos inspector.) If you have ceramic tile on the floor you can lay newer tile on top of it as long as it's face is level and not too smooth. You might need to sand the face to let your bonding have a good chance.

In conclusion, a microscopic planning and opinion will go a long way toward making your tile facility project a long-lasting expanding to your home, so take the time before you go in with "both guns blazing".

I hope you receive new knowledge about Tile Shop. Where you can put to use within your daily life. And above all, your reaction is Tile Shop.Read more.. Ceramic Tile Underlayments - The Basics. View Related articles associated with Tile Shop. I Roll below. I actually have suggested my friends to assist share the Facebook Twitter Like Tweet. Can you share Ceramic Tile Underlayments - The Basics.

205 Monroe Ave. Frederick, MD House Promo

1# 205 Monroe Ave. Frederick, MD House Promo. Advertisements

VDO of 205 Monroe Ave. Frederick, MD House Promo

205 Monroe Ave. Frederick, MD House Promo Tube. Duration : 2.35 Mins.


We had a good read. For the benefit of yourself. Be sure to read to the end. I want you to get good knowledge from Tile Shop Locations. www.redfin.com Live in downtown Frederick, just a mile from the antique shops and nationally-recognized restaurants that make Frederick special, without sacrificing the feel of being in the country. Enjoy amazing views of a field of horses from the front porch and the mountains from the huge backyard and private upstairs balcony. You'll love cooking in the brand new custom kitchen with granite counters, tile floor, stainless steel appliances, breakfast bar, and walk-in pantry. This charming brick row house in a unique location has 3 bedrooms, an office space or den in the basement, a sunroom off the back, and a completely remodeled bath with a glass vessel sink and gorgeous fixtures. This home has been meticulously updated to preserve its character and charm, without foregoing the luxury of modern conveniences. Off-street parking (carport and garage) Large fenced backyard Original hardwood floors and wood trim throughout 3 bdrms, 1 bath, brand new kitchen & bath, sunroom, office/den in basement Walk-in pantry Upstairs balcony ADT alarm system Updated electric, new water heater, new washer/dryer Wiring in family room for surround sound
View Related articles related to Tile Shop Locations. I Roll below. I actually have recommended my friends to help share the Facebook Twitter Like Tweet. Can you share 205 Monroe Ave. Frederick, MD House Promo.

400 Sims Avenue, Columbia, South Carolina 29205

### Tile Shop - 400 Sims Avenue, Columbia, South Carolina 29205.### Advertisements
The content is nice quality and helpful content, That is new is that you never knew before that I know is that I even have discovered. Prior to the unique. It's now near to enter destination 400 Sims Avenue, Columbia, South Carolina 29205.

Do you know about - 400 Sims Avenue, Columbia, South Carolina 29205

Tile Shop ! Again, for I know. Ready to share new things that are useful. You and your friends. What I said. It isn't outcome that the real about Tile Shop . You look at this article for information about what you wish to know is Tile Shop .

How is 400 Sims Avenue, Columbia, South Carolina 29205

400 Sims Avenue, Columbia, South Carolina 29205 Tube. Duration : 4.43 Mins.


We had a good read. For the benefit of yourself. Be sure to read to the end. I want you to get good knowledge from Tile Shop . Contact Burton Fowles at 803-600-6479 - www.theknightco.com - Built in 1977 using reclaimed bricks for an older look and feel. Recently updated in 2009. k in renovations. 10' ceilings. Large formal living room with hardwood floors, recessed lights, updated molding and a fireplace; formal dining room with butler's pantry; Custom high-end cabinets in kitchen with top of the line granite counters, large farmhouse sink with subway tile back-splash; kitchen opens into family room; French doors from family room to private brick patio; updated marble in all bathrooms; 10 foot ceilings; custom crown molding; slate tile in foyer and hallway; hardwood floors; garage and work shop; corner lot with mature well maintained landscaping and irrigation. 3 year old roof.
I hope you obtain new knowledge about Tile Shop . Where you'll be able to put to utilization in your evryday life. And most significantly, your reaction is Tile Shop . View Related articles associated with Tile Shop . I Roll below. I even have counseled my friends to help share the Facebook Twitter Like Tweet. Can you share 400 Sims Avenue, Columbia, South Carolina 29205.

Homes for sale Milwaukee WI $109900 3 BRs, 1 full BA

#The Best Homes for sale Milwaukee WI 9900 3 BRs, 1 full BA. Advertisements

Good VDO of Homes for sale Milwaukee WI 9900 3 BRs, 1 full BA

Not some time past, I presented the story. Useful. today i am happy to gift Video on Tile Shop Milwaukee. i want it to block my sisters. and the public. info that is useful. along with your friends. Homes for sale Milwaukee WI 9900 3 BRs, 1 full BA, that I actually have seen this as an impressive contribution. VDO is the knowledge. The End. Judgment within the read. Homes for sale Milwaukee WI 9900 3 BRs, 1 full BA Video Clips. Duration : 0.48 Mins.

9900 3 bedrooms, 1 full bath 4231 S 4th St, Milwaukee, WI 53207 shorewest.com For more information contact: Paul Hintz Email: phintz@shorewest.com 414.762.2959 x153 Shorewest - South Suburban 8880 S. Howell Ave., Suite 800 Oak Creek, WI 53154 School District: Milwaukee MLS Number: 1244663 Property Type: Single Family Home Very nice aluminum sided three bedroom, one bath cape cod with newer roof, updated electric. Home has beautiful hardwood floors. Eat in kitchen, updated bath with shower over tub and ceramic tile. Large upper bedroom with hallway wall of closets. Glass block basement windows. 1.5 car garage with electric door opener plus extra parking are next to garage. Covered patio area off kitchen. Nice large yard with garden area. HSA home warranty for buyer. Square footage per city record and hasn't been verified by broker.
View Related articles related to Tile Shop Milwaukee. I Roll below. I actually have recommended my friends to help share the Facebook Twitter Like Tweet. Can you share Homes for sale Milwaukee WI 9900 3 BRs, 1 full BA.
We'll get this from me. I am pleased to present the information.

Friday, June 29, 2012

Duncan Brown - 3218 Heather St Vancouver Real Estate - SeeVirtual

1# Duncan Brown - 3218 Heather St Vancouver Real Estate - SeeVirtual. Advertisements

VDO of Duncan Brown - 3218 Heather St Vancouver Real Estate - SeeVirtual

Duncan Brown - 3218 Heather St Vancouver Real Estate - SeeVirtual Video Clips. Duration : 1.20 Mins.


We had a good read. For the benefit of yourself. Be sure to read to the end. I want you to get good knowledge from Tile Shop Locations. View www.seevirtual360.com to see PRICE and more PHOTOS. WHAT A LOVELY PLACE TO CALL YOUR FIRST HOME! THE TOWNHOUSE - simple and cozy open floor plan with 2 bdrms + office up (incl huge master), living/dining/kitchen on main opening onto generous west-facing partly covered patio. Finishes incl Brazilian walnut hardwood, ceramic tile, black granite counters and brand new stainless appliances. TWO parking plus locker u/g. THE BUILDING - "HEATHERSTONE" - extremely well built and well maintained complex on lovely tree-lined street with a real "neighbourhood feel". Steps to local parks and coffee shops and just 2 blocks to Cambie St for shops/restaurants/direct transit to Downtown. 10 blocks to Canada Line. Public Open House: Sat, April 16th, 2-4 PM. Bedrooms: 2 SqFt: 1033
View Related articles related to Tile Shop Locations. I Roll below. I actually have counseled my friends to assist share the Facebook Twitter Like Tweet. Can you share Duncan Brown - 3218 Heather St Vancouver Real Estate - SeeVirtual.

536 Halltown Road - WHITE HOUSE REALTORS 615-672-0302

1# 536 Halltown Road - WHITE HOUSE REALTORS 615-672-0302. Advertisements

VDO of 536 Halltown Road - WHITE HOUSE REALTORS 615-672-0302

536 Halltown Road - WHITE HOUSE REALTORS 615-672-0302 Tube. Duration : 2.15 Mins.


We had a good read. For the benefit of yourself. Be sure to read to the end. I want you to get good knowledge from Tile Shop Locations. Lana Murphy/Agent 615-512-0800. Home Located in Cottontown, TN. Come fall in love w/ this builders custom home sitting on 5+ acres. It is truly one of a kind w/too many extras to list. Soaring ceilings,beautiful trey ceilings,hardwood /tile floors,gourmet kitchen,30x50 shop,absolutely stunning craftsmanship throughout. View listing information at listings.realtracs.com
View Related articles associated with Tile Shop Locations. I Roll below. I actually have suggested my friends to assist share the Facebook Twitter Like Tweet. Can you share 536 Halltown Road - WHITE HOUSE REALTORS 615-672-0302.

Repairing a Loose Floor Tile

#1. Repairing a Loose Floor Tile Advertisements

Repairing a Loose Floor Tile

During the useful life of any tile floor, tiles will loosen and have to be repaired. The level of difficulty of this type of mend is about a 3 on a scale of one to ten; one being the easiest and ten being the hardest. This type of mend is costly when contracted out. assuredly within the skill level of most homeowners and given the allowable instruction, it can assuredly be done over a weekend. Let me give you a brief summary of how to fix a loose floor tile and save yourself an unnecessary labor fee from a general contractor.

Repairing a Loose Floor Tile

First, you will need a few simple tools, which should comprise eye protection, gloves, broom, dust pan or shop vacuum, hammer, masonry chisel, small taping knife, bucket, grout that matches the original, grout sponge, and a high potential thin set. The thin set should be of a modified nature, meaning that latex based additives have been mixed into it during manufacture. These additives allow the thin set to cure quicker and have a more resilient bond with the floor. It's good to have a spare tile or two just in case you accidentally crack the loose tile during the mend process.

The hardest part of the whole process is getting the loose tile off the floor. Even though the tile is not adhered to the sub floor any longer, it still will want to stay in place. The irregularities in the middle of the tile's edges and the grout against them need to be removed. With your security glasses in place, use the hammer and chisel and gently remove the grout colse to the loose tile. It is leading to use gentle, downward blows with your hammer. You may not be Michelangelo carving David, but you still need to be delicate. Be deliberate and remove all the grout from all 4 sides of the loose tile. The grout should be wholly removed until you expose the edges of the 4 adjoining floor tiles. Once the grout has been removed the tile should assuredly come up by hand. If this does not happen, gently pry the tile off the floor using the chisel. Make sure you safe the edges of the good tiles still on the floor.

Now that the tile has been removed from the floor, you will need to remove the thin set from both the tile and the floor. Using the hammer and chisel remove all the old thin set from the back of the tile. Be meticulous with hammering on the tile. Lay the tile on a firm surface such as a workbench, and take your time. One heavy handed blow from the hammer and your tile will crack. You do not have to be as meticulous with removing the thin set from the sub floor. remove sufficient so that the face of the tile, when placed back in its former location, is below the plane of the floor surface by practically 3/16 of an inch.

With the tile and floor free of any old thin set, it is now time to place the tile back in place. When mixing the new thin set, determined succeed the manufacturer's specifications. The substance should have the same consistency of peanut butter when properly mixed. It should assuredly cleave to your fingertips and stick to them when you touch it. Using the taping knife, apply thin set to the back of the floor tile and the face of the sub floor. When properly done, the thin set should exactly make up the gap in the middle of the sub floor and the tile, allowing the face of the tile to lie in the same plane as the floor. Again, following the manufacturer's specifications, allow the thin set to cure. From my experience, overnight will commonly be enough.

The last step is to reapply grout colse to your newly placed tile. As always, succeed the instructions recommended by the manufacturer. Using the taping knife, fill the space in the middle of the tiles with grout and wipe the excess away with the grout sponge. The leech should be wet, but not too wet. Novice tile setters tend to use a leech that has too much water in it. Too much water allows the leech to remove an inordinate estimate pigment from the grout. The grout will then take on a whitish color that doesn't match the existing grout color well. Wringing out the leech as hard as you can you will be fine. An developed technique is to feather the new grout over the old. This allows the colors to blend and won't be as noticeable.

In conclusion, be diligent in cleaning the floor tile and sub floor of old thin set. Do your best to get the tile back in the same plane of the floor. Grout with care and feather the new grout over the old grout. If you succeed these instructions to the best of you ability, you will have a completed mend equal to, if not better than, any contractor could have done for you.

share the Facebook Twitter Like Tweet. Can you share Repairing a Loose Floor Tile.

The Best Marble Tile Colors For Your Shower

--The Tile Shop of The Best Marble Tile Colors For Your Shower-- Advertisements

The Best Marble Tile Colors For Your Shower

Enhancing the charm of one's home is not only little to creating striking front terraces or lavishly designed living rooms.

The Best Marble Tile Colors For Your Shower

Designing an elegantly crafted and styled bath or shower room adds extra value to a home, and provides an widespread aesthetic feel. Citizen these days have not just relied on shiny finishes, but have also dabbled toward matte or rustic finishes.

In stones like marble, look for tumbled and honed marble tiles, which have a old-world look that perfectly blends with the soft look of earth tones. Unlike the polished stones, they have irregular shapes and a muted appearance. Whatever the designs, marble tiles perfectly compliment a fantastic bathroom.

General Applications For Marble Tiles

Currently, there are a estimate of natural stone tiles being used in residential and industrial applications. Marble tiles regularly are convenient for general residential and light industrial applications, and they growth the aesthetic values of most homes and offices.

There is, however, an application that marble is not well great for, and it is for kitchen countertops, since marble's blend fades and depreciates when exposed to acidic material. The most base residential uses of marble are for window sills, fireplaces hearths, attractive foyers and bathroom floors. Other bathroom applications for marble consist of wall covering, backsplashes, tub decks and showers.

Popular Marble Tile Designs

Using marble tiles for bathroom floors and surfaces are necessary if your main goal is to originate an elegant shower room. These tiles are ready polished, tumbled or honed. Honed tiles are used to supply more traction, while polished tiles will supply a more elegant look, but could become slippery when wet, so bath mats need be settled at necessary points to forestall accidents like sliding. Tumbled marble, with its old-world feel and rustic look,is also becoming a beloved option for many homeowners.

Marble Floor Tile Colors And

Marble tiles are truly viable tiling materials for bathrooms, entryways, fireplaces, living and dining areas. These tile types are ordinarily utilized for both interior and covering flooring applications. Among the many ready marble tile colors are white, red, black, mottled and banded gray, pink and green.

For each color noted, there may be some variations and mixtures, and these are mostly ready at the nearest home décor shops or hardware store. Floor tile sizes ordinarily range from 305 x 305 mm to 800 mm free length.

The tile halt could also vary from polished, gauged or beveled. Natural stones, such as marble and limestone, have prices fluctuating from to per quadrilateral foot, and are more base in higher-priced renovation. Glass tiles on the other hand, can cost as much as to per quadrilateral foot, depending on the design.

Marble floor Tile Maintenance

While marble can originate a shiny, elegant look, it requires more maintenance than ceramic tiles. Marble is ordinarily a porous material and should be sealed once every one to two years, depending on how much the area is used. For example, if you have a steam shower that you use every day, you should seal the tiles more often because the steam and heat could break down the treatment.

Marble Tile - http://tilenet.net

share the Facebook Twitter Like Tweet. Can you share The Best Marble Tile Colors For Your Shower.

Five Best Selling Flea market Items For Summer

#1. Five Best Selling Flea market Items For Summer Advertisements

Five Best Selling Flea market Items For Summer

If you want to make big profits in a small sales business, you must find the best selling flea market items. Starting a flea market firm is a great way to make extra money or create an entire income with sales. The best selling flea market items, although they may vary from location to location, are approved in most cases. The following best selling flea market items can help you make money.

Five Best Selling Flea market Items For Summer

T-Shirts

Both pre-printed and solid t-shirts are hot sellers at many flea markets. With low prices, habitancy will be happy to buy them in bulk. Un-printed t-shirts are especially popular at flea markets with a large blue-collar population. In the hot summer sun, workers need a lot of t-shirts to stay clean.

Hats

On hot summer days, hats sell fast on a flea market table. Although straw hats can be difficult to transport, cloth hats such as baseball caps and trucker hats are easy to store and set up for sale. Hats are great impulse buy items on sunny days. Offer an assortment of mens, womens, and childrens hats for maximum sales.

Costume Jewelry

Trendy costume jewelry with beads, leather, metal, and charms sell fast to kids and teens. It is also very easy to find costume jewelry at low wholesale prices. More teens are out at the flea markets in the summer when they have no homework on the weekends.

Sunglasses

Both inexpensive generic sunglasses and knock-off designer look-a-likes sell at flea markets. habitancy will buy them naturally because they forgot their shades in the car and they can't stand the glare.

Cheap Toys

Kids at the flea market often have a dollar or two in their pocket. It is easy to sell cheap toys to them if your prices are low enough. Kids are out of school and seeing for fun in the summer.

Learn how to target the right flea market products to the season if you want to maximize your income. When the summer brings the hot sun to the sale venue of your choice, anticipate what customers want and give it to them cheap. Profits will soar.

share the Facebook Twitter Like Tweet. Can you share Five Best Selling Flea market Items For Summer.

Heidelberg part2

1# Heidelberg part2. Advertisements

VDO of Heidelberg part2

After we have a tendency to got the knowledge regarding The Tile Shop ago VDO, we'll explore the Heidelberg part2. I urge everyone to use judgment in the audience. A recent survey found that I even have come upon Heidelberg part2. I saw that it was important for them to be revealed. If any errors. I apologize. If you do not need to publish VDO. i'm pleased to be here. Thanks for a great VDO. Heidelberg part2 Tube. Duration : 28.20 Mins.

Heidelberg has a pleasant, old-fashioned appearance, with charming four-story buildings that share a similar architecture of matching facades and harmonious, earth-tone color schemes, topped with clay-tile roofs. No two buildings are exactly alike and yet they all blend seamlessly in a simple Baroque style. While the exteriors may be centuries old, they are maintained spotlessly with fresh paint and modern fixtures. The shop interiors are totally contemporary, if not futuristic, with all the latest goods on sale. Numerous restaurants will delight you with their gourmet fare and tasty beer. We then visit the most important single sight in Heidelberg -- the magnificent castle on the hill. It is a romantic ruin, with enough buildings still standing to present a very good idea of how wonderful this complex was during its glory days in the 15th-17th centuries. The extreme mix of destruction and beauty conjures up the turbulent past of this strategic fortification, with crumbling walls and towers standing next to a complete palace containing a fully-restored interior. And while here, you get a fantastic view looking down on the Old Town -- more than just beautiful, this is one of the great vistas of Europe, and the castle itself ranks in a lofty league with those of Salzburg or Edinburgh.
View Related articles related to The Tile Shop. I Roll below. I even have counseled my friends to assist share the Facebook Twitter Like Tweet. Can you share Heidelberg part2.
We'll get this from me. I am pleased to present the information.

Rustic Country Decor - How to Decorate bungalow Style Homes

#1. Rustic Country Decor - How to Decorate bungalow Style Homes Advertisements

Rustic Country Decor - How to Decorate bungalow Style Homes

Rustic country decor and how to decorate cottage style homes are extensions of American country style decorating. In addition, traditions are borrowed from French, English and some Swedish country looks. Rustic country decor can be defined as coarse, charmingly simple, unfussy, unfinished and yet with endearing qualities. Rustic country decorating includes the use of natural woods, aged surfaces, rough finishes and easy lines. cottage style homes are comfortable, modest, quaint homes that can be made of thick stone or log wood.

Rustic Country Decor - How to Decorate bungalow Style Homes

Floors in rustic country decor and cottage style homes are made with stone or wood materials. Wooden floors were traditionally constructed with boards that were bare and naturally waxed and hand-polished (high-gloss varnishes did not exist). Sometimes the boards were painted with light colors. If you like floor coverings, use oriental rugs and throws for visual warmth and color. Rustic country decor is about handcrafted objects, simplicity, furnishings that you enjoy and connecting back to nature.

Rustic cottage furniture is commonly made with pine and maybe painted with hand-painted designs such as flowers, birds, animals, country landscape or leaves. Use ladderback chairs, rocking chairs, benches, wicker furniture and Windsor chairs. A large rectangular table made of pine is a good choice for your kitchen or dining room table. To give your furniture a rustic look, brush a coat of paint on the furniture piece, then rub most of the paint off. After it dries, apply wood stain unevenly for an older weathered appearance. It will be exquisite and rustic looking!

Baskets can be used to store wood, pine cones, flowers, plants and needlework. Brass candle holders, oil or kerosene lamps, sconces, hurricane lamps, tin lanterns, recessed ceiling fixtures or a vintage wrought-iron or metal chandelier supply prosperous lighting for rustic country decor and cottage style homes. Colors used in rustic country decor or cottage style homes are neutral tones fluctuating from white to bone, earth tones, red barn, blues and greens.

For rustic country decor in the kitchen, use open shelves, hutches, buffets, plate racks and cupboards for storage. Often, country kitchen storehouse is crammed with stoneware pots, plain glazed earthenware and glass jars. Kitchen pots should be made of copper, steel or cast iron -- cookware tends to be large and plain. Use open shelving in the rustic country kitchen to display plates, dishes and dinnerware collections. Natural woods, light colors and exciting fabrics work great for window treatments. Adding a rustic butcher block island creates a overwhelming visual result as well as provides useful functionality.

A rustic country decor bathroom has neutral tones or soft colored walls, antique-looking lighting, and wooden antiques or aged reproduction cabinets and vanity. Knowing how to decorate cottage style homes and bathrooms can result in creating a calm and elegant atmosphere. Clawfoot tubs, pedestal sinks, country style aged brass faucets and old-fashioned country cabinets supply the kind of atmosphere that makes you want to spend time there. Plain white towels are recommended instead of patterned or exciting contemporary patterns. Use wicker or wire baskets to keep your sponges, loofas and shampoos handy near the tub or shower.

Understanding how to decorate cottage style homes means including items like quilts, aged furniture or reproductions, flea-market pieces, trunks, chests, armoires, stenciling, wallpaper, adirondack chairs, flower wreaths and restaurant chairs. These types of elements give cottage style homes the kind of rustic country decor that is simpler, very personal and warmly inviting.

Whether in a seaside setting, an urban environment, a countryside location or a wooded mountain retreat, cottage style homes are cozy and unassuming, combining the past with the present. Read all you can find and learn what creating the rustic country cottage means to you no matter where it's located. Enjoy expressing your personality and showing what the definition of home means to you.

Copyright 2005 InfoSearch Publishing

share the Facebook Twitter Like Tweet. Can you share Rustic Country Decor - How to Decorate bungalow Style Homes.

Thursday, June 28, 2012

Robin Tucker of Wood Mosaics: medium oak ASC lazy susan

1# Robin Tucker of Wood Mosaics: medium oak ASC lazy susan. Advertisements

VDO of Robin Tucker of Wood Mosaics: medium oak ASC lazy susan

After we got the knowledge regarding The Tile Shop ago VDO, we'll explore the Robin Tucker of Wood Mosaics: medium oak ASC lazy susan. I urge everyone to use judgment within the audience. A recent survey found that I have stumble upon Robin Tucker of Wood Mosaics: medium oak ASC lazy susan. I saw that it had been vital for them to be revealed. If any errors. I apologize. If you are doing not wish to publish VDO. i am pleased to be here. Thanks for a good VDO. Robin Tucker of Wood Mosaics: medium oak ASC lazy susan Video Clips. Duration : 1.18 Mins.

www.etsy.com See the Article on Etsy's blog: The Storque, for more information. Robin Tucker of woodmosaics talks about some of his wood-inlayed work. Robin's use of exotic woods from all over the world add to the beauty of his intricate designs. See more of Robin Tucker's beautiful designs at his Etsy shop: www.etsy.com
View Related articles related to The Tile Shop. I Roll below. I have counseled my friends to assist share the Facebook Twitter Like Tweet. Can you share Robin Tucker of Wood Mosaics: medium oak ASC lazy susan.
We'll get this from me. I am pleased to present the information.

How To install floor covering On Stairs

#1. How To install floor covering On Stairs Advertisements

How To install floor covering On Stairs

There are basically two methods of installing floor covering on stairs. One is the waterfall recipe where one piece of floor covering covers each riser and tread. The other is the cap and band installation. In this case the cap is a piece of floor covering installed over the treads and the band is the piece that will cover the risers. In this narrative I will show you how to setup floor covering using the waterfall method. These instructions are for basic stairs and not for spiral stairs which would want additional procedures.

How To install floor covering On Stairs

Tools Needed:

Tack strips

Staples or upholstery nails

Measuring Tape

Knee Pads

Knee kicker (check your rental store)

Stair Tool (check your rental store)

Utility knife

Hammer

Safety glasses

Obviously you'll need to remove all the old carpet. Get rid of the tack strips and don't try to use the old padding. Make sure any nails and staples are removed and sweep down the area to be carpeted.

Before you get started you're going to have to form out how much floor covering you'll need. To think the width plainly measure over the tread. If your stairs are open on one or both ends make sure to measure under the nosing to where it meets the riser and add it to the total width. form the total distance of your flight of stairs by measuring the tread and riser. Assuming your going to use floor covering pad make sure to add at least 3 inches per stair. If your steps have nosing add one foot to the total flight measurement.

Okay, let's get started. Apply the tack strip to the stair crotch location. Next you'll need to tighten the floor covering by tucking in the crotch. You can do this by using a knee kicker. It is a tool used to setup floor covering in small areas and stairs. It consists of a piece of metal tubing with a pin plate attached to it. On the other end it has a padded upholstery where you can position your knee to apply pressure to the carpet. You should be able to find one at your local rental store. plainly place the padded end several inches above your knee and add pressure.

This is where you will use the knee kicker:

To attach to the tack strip you need to use the knee kicker to stretch the floor covering straight from the center of the tread and hook it to the tack strip located at the crotch. Once the floor covering has been hooked to the tack strip you need to firmly attach it by sliding your floor covering tool back and forth to compress the pins. Using your utility knife or floor covering knife trim as needed. A floor covering knife is great as it has two sides and is sharper than a utility knife. Repeat this process on each side of the tread. Before going to the next tread make sure the floor covering is smoothed out on the riser and then staple to the stair lip. I would advise you staple about every 2 inches. Don't forget to also staple along the edge of the riser.

Make sure to step back and take a look at your work before going on to the next tread. Is the floor covering smooth? Did you kick it in evenly? It is also a good time to give your knees and back a rest. If all looks good the continue onto the next tread. If not you'll have to pull the floor covering off and setup it again. Repeat this process until you are finished.

Once done stand back and admire your work and give yourself a pat on the back. You now have a gorgeous finding staircase.

share the Facebook Twitter Like Tweet. Can you share How To install floor covering On Stairs.

pawn shop dumb ass snorts wet saw dust to get out of work (Part 1)

### Tile Shop - pawn shop dumb ass snorts wet saw dust to get out of work (Part 1).### Advertisements
The content is good quality and helpful content, That is new is that you just never knew before that I know is that I even have discovered. Prior to the unique. It's now near to enter destination pawn shop dumb ass snorts wet saw dust to get out of work (Part 1).

Do you know about - pawn shop dumb ass snorts wet saw dust to get out of work (Part 1)

Tile Shop ! Again, for I know. Ready to share new things that are useful. You and your friends. What I said. It is not outcome that the real about Tile Shop . You look at this article for information on anyone want to know is Tile Shop .

How is pawn shop dumb ass snorts wet saw dust to get out of work (Part 1)

pawn shop dumb ass snorts wet saw dust to get out of work (Part 1) Tube. Duration : 1.30 Mins.


We had a good read. For the benefit of yourself. Be sure to read to the end. I want you to get good knowledge from Tile Shop . this kid is new and spent an hour cleaning this saw and finally made a deal!!!!!! BTW HERE IS THE LINK FOR PART 2 (www.youtube.com
I hope you receive new knowledge about Tile Shop . Where you possibly can offer utilization in your everyday life. And most importantly, your reaction is Tile Shop . View Related articles related to Tile Shop . I Roll below. I even have counseled my friends to assist share the Facebook Twitter Like Tweet. Can you share pawn shop dumb ass snorts wet saw dust to get out of work (Part 1).

5 Tile Floor Tips For Your Basement

Tile Shop - 5 Tile Floor Tips For Your Basement Advertisements
The content is nice quality and useful content, That is new is that you never knew before that I know is that I have discovered. Before the unique. It is now near to enter destination 5 Tile Floor Tips For Your Basement. And the content associated with Tile Shop.

Do you know about - 5 Tile Floor Tips For Your Basement

Tile Shop! Again, for I know. Ready to share new things that are useful. You and your friends.

Refinishing or refurbishing your basement is a big job that can be high-priced and challenging. But gaining the added living space is often considerable sufficient to warrant the effort. One of the most important parts of redoing your basement is the floor. Either you are working with a concrete or wooden floor, you may want to reconsider someone else type of flooring that will prove more durable and easy to clean. When you are giving opinion to which selection will work best for your home, reconsider the following data with respect to a file floor for your basement.

What I said. It is not outcome that the true about Tile Shop. You check out this article for home elevators anyone want to know is Tile Shop.

How is 5 Tile Floor Tips For Your Basement

We had a good read. For the benefit of yourself. Be sure to read to the end. I want you to get good knowledge from Tile Shop.

1. A tile floor is relatively reasonable compared to other types of flooring. Depending on the grade and style you buy, you might be able to get the peel-and-stick brand that you can lay down yourself instead of hiring it done. This will suit not only your wallet but your schedule, since it can be done in stages, as you have the time, and perhaps with the help of a friend or family member. Of course, you can get the more high-priced styles, and pay more, for a richer or more polished look, depending on your plans for the basement's use.

2. Tile is replaceable, so if one or more pieces should get stained, chipped, or torn, you can take them up and lay down new ones at your convenience. Instead of waiting for a aid call from man who only works weekends for double-time pay, you can do it yourself in time for the next party or family get-together.

3. Tile flooring is easy to clean. You don't have to worry as much about spilled beverages, pet accidents, or muddy shoes tracking through. Just fill a pail with hot water and mild detergent, or anyone the tile manufacturer's directions suggest, and mop up dirt, dust, and debris in a few minutes' time.

4. Tile is no ifs ands or buts changed. If you get tired of the fabricate and want to change it, or decide to put down rug when you get an unexpected monetary windfall, you can make the switch fairly speedily and easily. Some population decide to lay rug on top of the tile, which makes it easier than taking up the old and putting down the new floor covering.

5. Tile patterns are versatile. You can select a basic monotone color to blend in with neutral surroundings. Or buy a modern fabricate to turn your basement into a family recreation room. A more sedate, intricate pattern provides a nice floor face for a room that will become your den or a spare bedroom. Throw down a few accent rugs (the non-skid variety) and enjoy the brand new look.

Floor tile can take a pretty rough beating from shoe scuffs, equipment scrapes, and running back and forth, if you have kids. With many inspiring patterns to select from, you can dress up your basement in anyone décor you like, and then let the games begin!

I hope you have new knowledge about Tile Shop. Where you'll be able to put to use within your day-to-day life. And most significantly, your reaction is Tile Shop.Read more.. 5 Tile Floor Tips For Your Basement. View Related articles related to Tile Shop. I Roll below. I have counseled my friends to assist share the Facebook Twitter Like Tweet. Can you share 5 Tile Floor Tips For Your Basement.

Hacksaw, Handles & Blades - No, You Don't Know How to Use One

###Hacksaw, Handles & Blades - No, You Don't Know How to Use One### Advertisements

Hacksaws are one of the most base hand tools. Nearly everybody owns one, and if you don't have one, you need to buy one. Hacksaws are cheap and very economical to use. But most of you never use it because the one time you tried to use it things didn't go well. You broke the hacksaw blade, the blade kept falling out of the handle, or it kept getting stuck in the piece you were trying to cut. If you did administrate to get the piece cut, it took forever and the cut ended up crooked.

Tile Shop Milwaukee

The main reasons most habitancy have mystery when sawing metal with a hacksaw are:

You have the blade in wrong

You aren't using a sharp blade

There is too much flex in the blade

The estimate of teeth is to low for the project

You are putting too much pressure on the saw

You don't clamp the work.

I will cover each of these difficulties as you and I go straight through this article.

Hacksaws and hacksaw blades are designed to cut metal (I will tell you how to use it to cut wood and plastic) and most habitancy find cutting metal very difficult and frustrating. The reason, most of the time, is that they don't admittedly know how to use the metal hacksaw.

What is a Hacksaw?

A hacksaw is a metal frame designed to hold a tempered metal blade. The blade is typically 1/2 inch high and the majority of them are 12 inches long. The blade has a hole on each end that fits into pins on the hacksaw. Hacksaws are designed to cut on the push stroke. The deal with (grip) on a properly designed saw is angled just right so you put a slight pressure on the blade when you push it straight through the material you are cutting. Even though some so-called "experts" will tell you that you can put the blade in the other way a hacksaw does not work well if you have the blade in backwards.

Do you need a Hacksaw?

You can cut almost whatever with a hacksaw. Although it was designed to cut metal, you can use it to cut plastic, wood, metal tubing, aluminum, copper, and brass. It works very well to cut electrical tubing (conduit), Bmx (flexible metal tubing), plastic water pipe, (Pvt & Cvt) and even nuts and bolts. You can use it to cut a 2X4 in a pinch and with the right blade ceramics tile.

Setting up the Hacksaw to Cut.

Step 1. Conclude which blade you will use to cut the material. Use a 32 t.p.i. Blade for conduit, an 18 tooth blade for cutting off a bolt or plastic pipe and an 8 tooth for wood. In institution you want at least three teeth in contact with the material at any time. If you are cutting deeper than the depth of the blade use a blade that has wavy teeth. The wavy blade leaves a wider slot (kerf) that keeps the blade from sticking in the groove you are cutting.

You can use it to cut wood. It will cut a lot slower than a wood saw, but it works if you don't have whatever else. Use a 8 or 10 tooth blade and mark the cut line on the board both horizontally and vertically. Use the horizontal mark to make you first cut (groove) and the vertical mark to keep your cut straight. Take your time and don't put a lot of pressure on the hacksaw.

Step 2. Insert the blade so that the teeth are pointing forward. If you can't see this, rub your finger slowly over the teeth of the blade.

You will feel the teeth "grip" your finger. Put the blade so it grips when you push the saw. The holes of the blade go into the pins on the bottom of the frame. Many hacksaws are designed to take distinct length blades so if you have an adjustable frame you may have to shorten or lengthen the frame to fit your blade.

The teeth should try to "grab" your finger when pushed. If they don't feel sharp, the blade is dull and should be replaced. Blades are cheap so don't be afraid to replace it.

Step 3. Tighten the thumbscrew until you can't turn it with your hand (Hand tight) This estimate of tension on the blade should keep the blade from bowing as you cut. Sometimes when I am have problems with the blade falling off, I will tighten it an additional one 1/4 turn with a pliers.

Ok, Let's Cut Something.

I am going to use a metal pipe for this example. It is easy to cut and once you get a slight contact using the hacksaw, cutting metal will be a breeze.

To admittedly use a hacksaw well you need to clamp your work. I have a vise on a workbench that I usually use.

If you don't have a vise, screw a 2X4 onto your bench and hold the pipe against the 2X4 with your left hand. When inherent use a vise or clamp to derive the metal you want to cut.

Step 1. To use a hacksaw properly, grip the frame with both hands. (I am right handed so I grab the deal with with my right hand and use my left hand to hold the other end of the saw.) Hold the hacksaw so that your right hand index finger is pointing ahead to help guide the saw. As you push the blade (forward stroke) use your left hand to guide the saw so that it cuts straight. Do Not use your left hand to apply pressure, just use it to guide your cut. Use most of the blade. If you apply pressure on the forward stroke with your left hand the teeth will usually grab too much and the saw will "stick". Again a hacksaw deal with is angled to give you the permissible down pressure on the blade.

Step 2. When you get to the end of the forward stroke, stop and pull the saw back with your right hand. As you pull back don't apply any pressure with your right hand. (It only cuts in the forward direction and putting pressure on the return stroke will just wear out the blade prematurely). A lot of teachers will make you lift the saw on the return stroke so you don't destroy the blade. Move your body forward and back as you cut, pressing on the forward stroke and easing off on the return one.

Step 3. Repeat this until you saw all the way straight through the pipe. With a slight institution you will be able to cut at about 1 stroke every second. Don't stroke any faster than this because it will generate too much heat and again wear out the blade prematurely.

Don't put too much pressure on the blade. You may have to break a blade or two before you get the feel of how much pressure you can apply. Don't worry, they are cheap. Don't saw too speedily as that can cause the blade to break as well. Always check to make sure that the blade is secured tightly in its frame.

Reviews. Or Don't buy one at Wally World

Believe it or not, I could tell you a lot more about using a hacksaw, but this is enough to get you cutting properly. Buy a good capability hacksaw I suggest on my website. Even the cheap one I suggest is good capability and will last you years. With a capability saw it won't take long before you get good at using one.

Don'T buy a cheap one at the local dollar store. Why? The hacksaw deal with has to be strong enough to keep the blade tensioned correctly and the cheap ones will give you nothing but years of frustration. Also buy a hacksaw with the deal with tilted like the Stanley 150565. Some hacksaws have a level deal with and are very hard to use for a beginner.

Blades are cheap, so buy a box of them in at least two "teeth" numbers (32 teeth for metal conduit and 18 teeth for solid steel, plastic pipe and general use. But don't buy cheap blades. The cheap blades are too fragile and you will end up breaking a lot of them. A good hacksaw blade cuts on it's own with very slight pressure from you so change the blades as soon as they get dull. To tell if a blade is dull pull your finger over the blade. If it is still sharp the teeth will try to "catch" on your finger. A dull blade won't. I prefer Milwaukee blades because they will flex without breaking, and last a long, long time compared to the cheap blades. Great yet, buy two cheap hacksaws and keep distinct blades on each. Dull, worn blades take a lot of work to cut an item, so change them as often as you would a utility knife or razor blade.

Follow the link below for ToolBoxHero to buy your new Hacksaw, read reviews and get more information:

Hacksaw, Handles & Blades - No, You Don't Know How to Use One

Noble FreeStyle Linear Drains

1# Noble FreeStyle Linear Drains. Advertisements

VDO of Noble FreeStyle Linear Drains

After we tend to got the knowledge regarding The Tile Shop ago VDO, we are going to investigate the Noble FreeStyle Linear Drains. I urge everyone to use judgment in the audience. A recent survey found that I even have come across Noble FreeStyle Linear Drains. I saw that it absolutely was necessary for them to be revealed. If any errors. I apologize. If you do not want to publish VDO. i am happy to be here. Thanks for an excellent VDO. Noble FreeStyle Linear Drains Video Clips. Duration : 2.35 Mins.

www.contractorsdirect.com - Buy Noble FreeStyle Linear Drains here Linear Drain with membrane clamping mechanism for thin-bed sheet membrane and pro base installations. The freestyle linear drain offers contemporary styling with exceptional reliability and installation simplicity. Design Creativity *Contemporary styling with a selection of six drain lengths and four brushed stainless steel strainer styles. *Freestyle linear drains allow the use of larger tiles for greater design flexibility (larger tiles also mean great load strength). Installation Versatility *Membrane clamping mechanism assures reliable, watertight installation. *Simple and piratical installation. Just flatten the Freestyle linear drain to the floor (drain body is flat on the bottom for quick fastening), tie in the plumbing, and attach membrane to clamping mechanism. *Use Noble NobleSeal TS membrane for the wall and you have the fastest most reliable waterproofing installation. Functional reliability *Membrane clamping mechanism assures a watertight seal with the shower's membrane system. Provides shower with a monolithic waterproof envelope. *One piece PVC or ABS construction ensures dependable performance with no manufactured seams. *Internal, vertical pre-strainer acts as a safety net to keep plumbing clear and prevent foreign objects from going down the drain. *Off-center 2.0" ID pipe opening *16 gauge Brushed Stainless Steel Strainer Drain includes: *NobleSeal flashing *NobleSealant 150 (used to ...
View Related articles related to The Tile Shop. I Roll below. I even have recommended my friends to help share the Facebook Twitter Like Tweet. Can you share Noble FreeStyle Linear Drains.
We'll get this from me. I am pleased to present the information.

Wednesday, June 27, 2012

4217 1/2 Sunnyslope Ave, Sherman Oaks, Homes for Lease

1# 4217 1/2 Sunnyslope Ave, Sherman Oaks, Homes for Lease. Advertisements

VDO of 4217 1/2 Sunnyslope Ave, Sherman Oaks, Homes for Lease

4217 1/2 Sunnyslope Ave, Sherman Oaks, Homes for Lease Tube. Duration : 1.17 Mins.


We had a good read. For the benefit of yourself. Be sure to read to the end. I want you to get good knowledge from Tile Shop Locations. Listed at: 00 Per Month (Lease) 4217 1/2 Sunnyslope Ave, Sherman Oaks, CA Estate Agent: Uri Raz cel:818.468.7174 email:800041.lead@cendant.leadrouter.com Ewing & Associates, Sotheby's International Realty Spanish style unit in duplex with its own entrance. Great location in Sherman Oaks near Ventura Boulevard restaurants and shops. This unit has 3 bedrooms and 2 1/2 bathrooms, wood and Spanish paver tile flooring, walk-in closets in bedrooms. Kitchen has a stove, microwave and dishwasher. Laundry in garage. Excellent for someone who needs a home office.
View Related articles associated with Tile Shop Locations. I Roll below. I have recommended my friends to help share the Facebook Twitter Like Tweet. Can you share 4217 1/2 Sunnyslope Ave, Sherman Oaks, Homes for Lease.

How to get ready For Your Immigrant Interview Or Hearing

Tile Shop Michigan - How to get ready For Your Immigrant Interview Or Hearing Advertisements
The content is good quality and helpful content, Which is new is that you simply never knew before that I do know is that I actually have discovered. Prior to the distinctive. It's now near to enter destination How to get ready For Your Immigrant Interview Or Hearing. And the content associated with Tile Shop Michigan.

Do you know about - How to get ready For Your Immigrant Interview Or Hearing

Tile Shop Michigan! Again, for I know. Ready to share new things that are useful. You and your friends.

No matter how much establishment is made for the interview for the Form I-130 relative request for retrial and/or Form I-485 adjustment applicant, if the spouses are not living together, discrepancies in their answers to the same detailed questions would belie the existence of good faith marriage that is required to regain legal permanent resident status.

What I said. It is not outcome that the real about Tile Shop Michigan. You look at this article for home elevators anyone want to know is Tile Shop Michigan.

How is How to get ready For Your Immigrant Interview Or Hearing

We had a good read. For the benefit of yourself. Be sure to read to the end. I want you to get good knowledge from Tile Shop Michigan.

A trained and experienced U.S. Citizenship and Immigration Services (Uscis) District Adjudication Officer (Dao) can frame and ask questions separately of the U.S. Habitancy petitioner and of the alien beneficiary to decree whether good faith marriage and shared life exist. Documents of shared life, photographs of the spouses before, during, and after the wedding, even joint revenue tax return(s) may not be sufficient. They can be no ifs ands or buts produced, even as the spouses are not no ifs ands or buts living together.

The interviewing Immigration Officer has to be convinced that the spouses got married because they love each other, and are living together as husband and wife. No more, no less. How do trained, experienced District Adjudication Officers or Assistant District Counsels of the branch of Homeland safety make this determination? By your answers to their questions while the interview or cross-examination in the Immigration Court.

Categories Of base Questions Asked And Intensity of Questioning By Daos:

This Author has personally attended the interviews and hearings of thousands of clients with the patrimony Ins and the Uscis and the Immigration Courts. The base questions asked by Daos and Assistant District Counsels can be categorized as follows:
(1) questions before the wedding;
(2) questions on the wedding;
(3) questions after the wedding;
(4) questions on living together;
(5) questions on work;
(6) questions on the family of each spouse;
(7) questions on special occasions;
(8) questions on personal possessions.

If the alien beneficiary is not in extraction (previously called deportation) proceedings, the Form I-130 request for retrial and the Form I-485 adjustment (green card) application are filed concurrently and adjudicated (decided) together by the assigned Dao. And if at the time of the interview, the marriage is less than two (2) years old, the grant of the Form I-130 request for retrial and the Form I-485 application would result in Conditional residence (Cr) for the alien for two (2) years.

Within ninety-days (90) of the second anniversary of the grant of the Cr, the spouses should jointly file Form I-751, extraction of Conditions on Residency, or unilaterally if separated, divorced, or widowed. There is a second interview for the Form I-751 application.

Thus, the questioning is not as intense, if the marriage is less than two (2) years. Similarly, the questioning is not as intense, if the alien is not in extraction proceedings. The questioning is most intense, if the alien got married after he or she had been located in extraction proceedings by aid of a notice To Appear (Nta) before an Immigration Judge. Clear and convincing evidence, not mere fifty-one percent (51%) of the preponderance of the evidence, is required for adjustment in case of marriage while extraction proceedings.

Questions On Facts And Events Before The Wedding:

In this category, the base questions asked are as follows:
(1) When and where did you first meet?;
(2) If a base friend introduced you to each other, what is his or her full name?;
(3) On what occasion were you introduced, and who were present on that occasion?;
(4) When and where was your first date?;
(5) How many dates did you have before you proposed?;
(6) When and where did you propose?;
(7) When and where did you meet each others parents and members of the family?;
(8) What are their names and approximate ages, occupations?;
(9) What gifts did you give each other before the wedding?;
(10) When and where did you ask the parents of your bride permission to marry her?;
(11) Did you have a wedding planner?;
(12) If so, give her full name, address, and how much he or she expensed both of you for his or her services?; and
(13) When and where did you live together before the wedding?

Questions On And After The Wedding And Honeymoon:

In these categories, the base questions asked are as follows:
(1) When and where were you married?;
(2) Who married you?;
(3) Who are the persons who attended the wedding?;
(4) Were photographs taken while the wedding?;
(5) Where is your photo album?;
(6) Where was the wedding reception?;
(7) Who attended the wedding reception?;
(8) How much did you pay for the wedding ceremony?; for the wedding reception?;
(9) Where and when was your honeymoon?;
(10) How much did you spend for your honeymoon?;
(11) Where did you get the money for your wedding?; for your honeymoon?;
(12) What activities did you do while your honeymoon?;
(13) Where did each of you work at the time of the wedding?;
(14) What was the name and telephone whole of your supervisor?; and (5) What was your job record and salary while your wedding?

Questions On Facts And Events On Living Together:

In this category, the base questions asked are as follows:
(1) Look at me (Dao) in my eyes, and can you say that you married your spouse for love, and not for a green card?; or for money you were paid?;
(2) Where did you live right after your wedding?;
(3) Where do you live now?;
(4) If you are renting, give the name and phone whole of your landlord?;
(5) How much is your monthly rent?; Who pays for it?;
(6) If it is an apartment, how many bedrooms are there?;
(7) If you are renting a room in a house, who are the other tenants?;
(8) What is your telephone whole at home?; your cell phone number?;
(9) Are you renting a furnished apartment?;
(10) divulge the furniture in your apartment?;
(11) If you furnished it, where did you buy the bed?; for how much?; how was it delivered?; who paid for it?;
(12) What part of the bed do you sleep?; what part of the bed your spouse sleeps?;
(13) What do you wear for sleeping?; what does your spouse wear for sleeping?;
(14) Do you cook?;
(15) What did you cook last night?; what is your popular food?; what is your spouse's popular food?;
(16) divulge the color of the tile in your bathroom?;
(17) What is the make and distance of your Tv in your bedroom?;
(18) How do you pay your rent?; utilities?;
(19) What kind of prestige cards do you have?; your spouse has?;
(20) Did you file joint revenue tax returns?;
(21) Do you have joint bank account(s)?; where?; how much is the current balance?; and
(22) What is the distinguishing feature of your rented house?; apartment building?

Questions On Work And The family Of Each Spouse:

In these categories, the base questions asked are as follows:
(1) Where do you currently work?;
(2) Give full name and telephone whole of your supervisor?;
(3) What are your job duties?;
(4) How much salary do you currently make?;
(5) Do you have benefits at work such as medical/dental insurance?;
(6) What are your work hours?;
(7) How do you get to work?;
(8) Where does your spouse currently work?;
(9) What is the full name and telephone of his or her supervisor;
(10) What kind of work does your spouse do? How much salary does he or she makes?;
(11) When did your alien spouse start to work?;
(12) Who are the parents of your spouse?; where do they live?;
(13) When was the last time both of you visited your in-laws?;
(14) How old are your in-laws?;
(15) If your in-laws are working, what do they do?;
(15) Who are the brothers and sisters of your spouse?;
(16) If your in-laws did not attend your wedding, what was their reason for not attending?

Questions On special Occasions And Personal Possessions:

In these last two (2) categories, the base questions asked are as follows:
(1) What did you do while the last birthday of your spouse?;
(2) What gift did you give him or her for his or her birthday?;
(3) What did you do for your last wedding anniversary?;
(4) What gift did you give to your spouse while your last anniversary?; (
5) What did you do last Valentine's Day?;
(6) What gift did you give each other?;
(7) What did you do last New Year's Eve?;
(8) What did you do last Christmas?;
(9) What Christmas gift did you give your spouse?;
(10) Does your spouse own a vehicle?; what is its make and year?; what is its color?;
(11) Are you in the assurance course of your spouse's car as an authorized driver?
(12) Do you own a car?;
(13) Does your spouse drive your car?;
(14) Is your spouse in the assurance course of your car?;
(15) Does your spouse have life insurance?;
(16) Who is the beneficiary in your spouse's life assurance policy?;
(17) What is your spouse's popular jewelry that he or she wears more often than others?

Ultimately, the truth normally comes out after intense interrogation: good faith marriage or marriage fraud, punishable as a federal felony with imprisonment for up to five (5) years and 0,000.00 fine under Ina Section 275(c).

***

(The Author, Roman P. Mosqueda, has practiced immigration law for over twenty (20) years.)

I hope you will get new knowledge about Tile Shop Michigan. Where you may offer used in your life. And most importantly, your reaction is Tile Shop Michigan.Read more.. How to get ready For Your Immigrant Interview Or Hearing. View Related articles related to Tile Shop Michigan. I Roll below. I actually have recommended my friends to help share the Facebook Twitter Like Tweet. Can you share How to get ready For Your Immigrant Interview Or Hearing.

Alpha AWS-125 Wet Stone Cutter

1# Alpha AWS-125 Wet Stone Cutter. Advertisements

VDO of Alpha AWS-125 Wet Stone Cutter

After we tend to got the data concerning The Tile Shop ago VDO, we'll verify the Alpha AWS-125 Wet Stone Cutter. I urge everyone to use judgment within the audience. A recent survey found that I actually have encounter Alpha AWS-125 Wet Stone Cutter. I saw that it had been important for them to be published. If any errors. I apologize. If you are doing not want to publish VDO. i am pleased to be here. Thanks for a good VDO. Alpha AWS-125 Wet Stone Cutter Video Clips. Duration : 0.72 Mins.

www.contractorsdirect.com - Buy Alpha AWS-125 Electric Saw here Alpha AWS-125 5in Wet Stone Cutter Powerful Wet Stone Cutter for Fabricators * 5" wet stone cutter can easily cut through 1-5/8" material. * Accept a curve cutting blade. Curve cutting operations are safer and easier with the AWS-125. * Built-in water feed system that eliminates the harmful dust particles which are common in dry cutting applications. * Side handle for more stability and control. * 12000 Rpm. 10 Amp, Weight 7.2 lbs Arbor 7/8" (22 mm) * Includes storage case included, water feed, and ground fault interrupter. * Suitable for use in the shop or on the job site, the AWS-125 is ideal for any professional stone fabricator/installer or tile contractor. * The AWS-125 Wet Stone Cutter is designed for use in the stone, tile and glass industry. * This machine is able to provide perfect straight cuts which is required for quality fabrication and installation. * Equipped with one of the most powerful motors in its class, the AWS-125 has the strength to power through tough materials, including porcelain and engineered stones. * Another safety feature included is a built-in GFCI (ground fault circuit interrupter). * Includes a side handle for more stability and control.
View Related articles related to The Tile Shop. I Roll below. I actually have recommended my friends to help share the Facebook Twitter Like Tweet. Can you share Alpha AWS-125 Wet Stone Cutter.
We'll get this from me. I am pleased to present the information.

109 Southwold Cir ~ Crowfield Plantation ~ Goose Creek ~ MLS# 1016946

1# 109 Southwold Cir ~ Crowfield Plantation ~ Goose Creek ~ MLS# 1016946. Advertisements

VDO of 109 Southwold Cir ~ Crowfield Plantation ~ Goose Creek ~ MLS# 1016946

109 Southwold Cir ~ Crowfield Plantation ~ Goose Creek ~ MLS# 1016946 Video Clips. Duration : 2.43 Mins.


We had a good read. For the benefit of yourself. Be sure to read to the end. I want you to get good knowledge from Tile Shop Locations. Updated Home on large lot in The Cherry Hill section of Crowfield Plantation!...The floor plan of this home is open, spacious and includes a large family room with vaulted ceiling and fireplace, an updated kitchen that features ceramic tile counter tops, smooth-top stove and an island with barstools(not built-in but can convey with acceptable offer)...Just off the kitchen is an over-sized sunroom, flooded with light, that over-looks the large back yard!............Other features include; hardwood floors, updated light fixtures, ceiling fans, window treatments, ceramic tile, slate floors in hall bath, surround sound in sunroom, A large master suite with updated bathroom and walk-in closet, A FROG that includes an additional half bath, A large rear deck, storage building / shop complete with power, a 2 car garage with door opener and so much more! ......The home has three bedroom plus a FROG...The owners are currently using one of the bedrooms as a formal dining but will convert back to a bedroom if buyer desires.....One Year AHS Warranty is included!...And don't forget all the amenities that Crowfield has to offer; Pools, park, clubhouse, hiker biker trails, tennis, boat / camper storage and a public golf course within the community!
View Related articles related to Tile Shop Locations. I Roll below. I actually have recommended my friends to help share the Facebook Twitter Like Tweet. Can you share 109 Southwold Cir ~ Crowfield Plantation ~ Goose Creek ~ MLS# 1016946.

teste-tiles-photoshop.avi

### Tile Shop - teste-tiles-photoshop.avi.### Advertisements
The content is nice quality and helpful content, Which is new is that you never knew before that I do know is that I have discovered. Prior to the unique. It is now near to enter destination teste-tiles-photoshop.avi.

Do you know about - teste-tiles-photoshop.avi

Tile Shop ! Again, for I know. Ready to share new things that are useful. You and your friends. What I said. It is not outcome that the actual about Tile Shop . You check this out article for info on a person wish to know is Tile Shop .

How is teste-tiles-photoshop.avi

teste-tiles-photoshop.avi Video Clips. Duration : 1.13 Mins.


We had a good read. For the benefit of yourself. Be sure to read to the end. I want you to get good knowledge from Tile Shop . Um teste de mapeamento para RPG Maker criando o mapa no Photoshop usando Brushes personalizados e layers com alguns efeitos.
I hope you receive new knowledge about Tile Shop . Where you may put to use in your evryday life. And most of all, your reaction is Tile Shop . View Related articles related to Tile Shop . I Roll below. I have suggested my friends to help share the Facebook Twitter Like Tweet. Can you share teste-tiles-photoshop.avi.

Finishing the Edges of Your Glass Tile facility

--The Tile Shop of Finishing the Edges of Your Glass Tile facility-- Advertisements

Finishing the Edges of Your Glass Tile facility

A big query for home owners installing glass tile is how to conclude the edges of your installation. If you are used to working with ceramic tiles then you have to realize there is a unlikeness with glass tiles. Ceramic tiles only have the color on the top so the edges are usually a plain white and must be covered up. Most glass tiles are colored throughout so even the edges are colored. This means that you don't need a bull nose tile to cover the edge to keep color.

Finishing the Edges of Your Glass Tile facility

Since most glass tiles are fairly thin, you have several options for completing the exposed edge.   A popular way to do this is to just rub grout into the small gap along the edge. First you need to tape it off so grout doesn't get on the wall or covering that the tiles are adhered. Then grout as usual making sure to rub the grout down the edge of the tiles. As soon as you clean off the excess grout, take off the tape to give a nice accomplished area.

Caulking is a way to get a smooth accomplished look to your tiles. When grouting, leave the gap of the tile edges alone. After the cleanup, take a caulk that is your grout color and caulk down the edge. You may be caulking other areas too so you can do it all at the same time. 

Framing it out is other way. It looks good but is a tiny more work. This is especially nice if you are doing wainscoting with tile on your wall or just running a border of tiles around your bathroom. Take a piece of molding and stain/paint it first. Then nail it in to frame your tiles after installation. It would be best to grout before doing this part.

Some population don't want the tiles to just stop at the end of their cabinets and counters. Try stair stepping the tiles down in a diagonal path to give it a more flowing look. This looks especially good if your top cabinets are not as wide as the lowest ones.

As you can see, there are several ways to conclude the edges of your installation. You can make it as easy or elegant as your space needs.

share the Facebook Twitter Like Tweet. Can you share Finishing the Edges of Your Glass Tile facility.